Leaderboard


Popular Content
Showing content with the highest reputation on 02/12/21 in all areas
-
Just thought I'd share my experience setting up a Valheim server with this docker app from @ich777(thank you!) You don't need to worry about Steam authentication for Valheim, the default anonymous user can download and host a server (yay!), so no fuss with Steam users or Steam Guard to worry about. Deploy the docker as provided, leaving username & password blank. The Server Name field is important, this is how your name will appear in the public server list in Valheim. (as of this writing there are 7 "Valheim Docker" server names, good luck finding yours! So choose something unique that you and your friends can find. World Name is the name of your world, this can be anything, if you wish to import a single-player or self-hosted save file in your docker, this name must be set to the same name/spelling as your save game world. Save the docker/let it install. You'll want to make sure your firewall or router has UDP ports 2456-2458 forwarded to your Unraid server's IP so the game can work as intended. In 10-15 minutes typically you should see your server name in the public server list in Valheim, you're done! * if you wish to import a previous save file, you need to make sure the Docker is Stopped first. Then browse your local computer's profile, typically in "%appdata%\..\LocalLow\IronGate\Valheim\worlds" you will find your save games. You'll want to take a copy of your world files, database, everything named the same as your world name over to your docker data files, by default with this docker settings should be: \\<your unraid server IP or name>\appdata\valheim\.config\unity3d\IronGate\Valheim\worlds Place your save game files in there, and overwrite any existing newly generated world of the same name with your save game. Start the Docker, wait for it to appear in Valheim, join & play! I hope this was helpful for someone, took a bit to figure out the exact steps to follow3 points
-
function virsh_device_by_bus($action, $vmname, $usbbus, $usbdev) { $usbstr = ''; if (!empty($usbbus)) { $usbbus=ltrim($usbbus, "0"); $usbdev=ltrim($usbdev, "0") ; $usbstr .= "<hostdev mode='subsystem' type='usb'> <source> <address bus='${usbbus}' device='${usbdev}' /> </source> </hostdev>"; } $filename = '/tmp/libvirthotplugusbbybus'.$vmname.'.xml'; file_put_contents($filename,$usbstr); return shell_exec("/usr/sbin/virsh $action-device '$vmname' '".$filename."' 2>&1"); #echo "Running virsh ${COMMAND} ${DOMAIN} for USB bus=${BUSNUM} device=${DEVNUM}:" >&2 #virsh "${COMMAND}" "${DOMAIN}" /dev/stdin <<END #<hostdev mode='subsystem' type='usb'> # <source> # <address bus='${BUSNUM}' device='${DEVNUM}' /> # </source> #</hostdev> #END } Here is some PHP code that I use for hotplugging USB devices into a VM.2 points
-
check your valheim appdata folder: appdata/valheim/.config/unity3d/IronGate/Valheim/worlds The database file is worldname.db There should be a backup called worldname.db.old - you can copy this to worldname.db (with the docker stopped), but you will lose any progress since this backup (check the date stamp on the .old file) If you don't have appdata filesystem snapshots, I recommend taking regular backups - this example script was shared a page or two back:2 points
-
With the release of Unraid 6.8 comes support for WireGuard VPN connections. At the moment the GUI part is offered as a separate plugin, but will be integrated into Unraid in the future. This approach allows for quick updates and enhancements without dependency on Unraid version releases. People starting with WireGuard should read the quick-start guide written by @ljm42. See Please use his topic only to ask questions about using and setting up WireGuard. The GUI has online help as well, please have a look at this too. Use this topic to report any issues or bugs or proposed enhancements for the WireGuard functionality. This way things stay grouped together. Thanks1 point
-
Yes, that's right: the man, the myth, the legend Spaceinvader One has graciously agreed to sit down for an interview with us. Check out our interview here: https://unraid.net/blog/spaceinvader-one-interview
 1 point
 -
Hello Unraid community, The Unraid forum is now on Invision Community v4.5.4.2. You also might have noticed a UI update as part of this upgrade sequence. During the update process, we received reports of low forum latency which had to do with an internal server slowdown issue. This issue should be resolved now. Thank you to everyone who reached out to report this. If you are experiencing any other forum related issues, please post them in Forum Feedback or you can also reach out to me directly. I hope you all have a great day! -Spencer1 point
-
Any Rick and Morty fans out there... here is a 1920x90 option. It works great with white text. I'll be adding an animated Rick and Morty themed banner within the next week or so.
 1 point
 -
My 1-year warranty was long-since expired when I opened it up and slapped the fan/heatsink on the CPU. I have had the switch for three years. Ubiquiti's warranty has some pretty strange conditions as well. A "one-year warranty" is not a one-year warranty to the end user. It is one year from when the equipment was shipped to the authorized reseller/distributor. If they shipped the switch to Newegg, for example in June, and I bought the switch in December, I only get a warranty in actual use for six months. For all I know, the warranty was expired on the switch when I bought it. If you buy direct from Ubiquiti, you get two years from delivery. Hmmm, from whom do they want you to purchase equipment? Here's the verbiage: "The “Warranty Period” means (a) for Products purchased by the customer directly from UBIQUITI’S Webstores, two years after the date of delivery of such Product to such customer and (b) for Products purchased from an authorized UBIQUITI distributor or reseller, one year after the date of shipment of such Product to such authorized distributor or reseller."1 point
-
Thank you! this worked1 point
-
Entering this in your Repository field should get you back to the last stable release: binhex/arch-rtorrentvpn:rtorrent-ps-1.1.r54.ga787dd9-1-281 point
-
I took a lot at the Parity Check Tuning Plugin and it was packaged with the nobody:users for all the files including / Slackware packages are simple tar files applied to root and the ownership and permissions of the folders will override the system one. I think If you rebooted now, you'd find yourself unable to ssh in @itimpi You should fix this by packaging as root with the correct permissions
 1 point
 -
OK guys, for now until i can get to the bottom of why some people can run this ok and others can't im going to roll this back to rtorrent-ps (minus pyrocore), please hold tight whilst i do some testing, i will let you know when its ready to pull.1 point
-
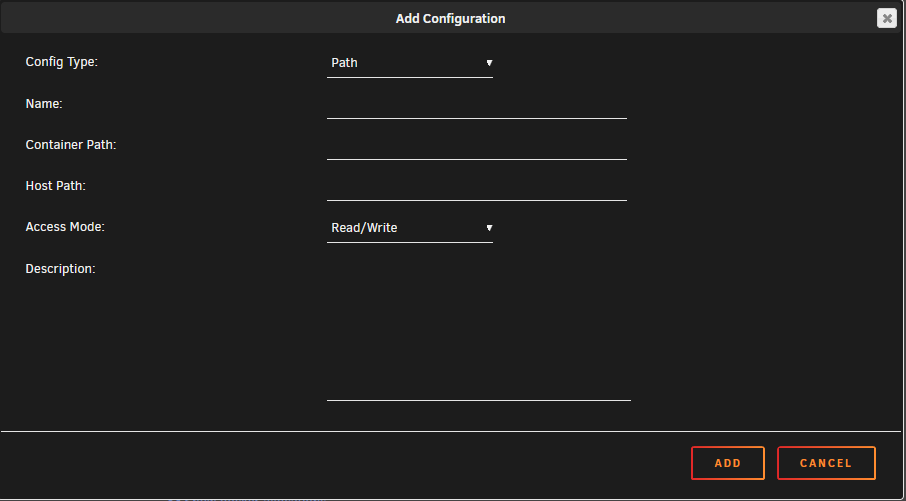
DEPRECATED: Due to multiple reasons I have decided to no longer up-keep this template. It will be removed from CA soon also. Overview: Support for my Docker template of the zabbix-agent container Application: Zabbix-Agent - https://www.zabbix.com/ DockerHub: https://hub.docker.com/r/zabbix/zabbix-agent Agent Version: 4.2 Minimum Server Version: 4.2 Before using this docker please make sure you have a Zabbix Server (optional to have Proxy as well) setup. In addition you should have a basic understanding of Linux. In case anyone is wondering, yes privileged mode does need to be left as enabled. This allows the agent to see system resources See the below exert directly from the official Zabbix DockerHub: "By default, Docker containers are "unprivileged" and do not have access to the most of host resources. Zabbix agent is designed to monitor system resources, to do that Zabbix agent container must be privileged..." Adding Disks for Monitoring: At the bottom of the docker configuration you will see this (click it): The following screen will load: When filling in the above make sure "Path" is selected from the drop down. - Name can be anything you want to call it, I would suggest calling the name of the disk - Container Path should be /mnt/[name of drive] example /mnt/disk1 - Host Path should be same as Container Path - Access Mode can be just Read Only - Description can be left - Now click Add

 1 point
 -
Progress - kind of. Tried all of the above, no difference. Then tried accessing from externally via reverse proxy, and I'm in. Restored original config/session and it's back to how it was (externally). Just can't access the web GUI from inside my network. All other dockers are fine internally (incl 7 other binhex), and I've made no changes to pfSense. Hadn't tried external links for a year because of lockdown here. My network here isn't complicated, so I'm scratching my head.1 point
-
The log will tell you what parameters to pass for your optical drive1 point
-
Yes this is a Plex feature (although I am not sure if it is a Plex pass only feature). You can disable it in your Plex settings -> Transcoder -> Enable HDR tone mapping.1 point
-
How are you dealing with ventilation?1 point
-
Syn setzt noch nen ziemlich alten Kernel ein (4 Kernel) Dort wird die e1000e Netzwerkkarte nicht unterstützt. Auch hat Syno die Treiber für Realtek Nic's aus dem Kernel entfernt. Somit funktionieren diese NIC's in DSM ab einer bestimmten Version nicht mehr (Ich GLAUBE ab Version 6.3) Nagel mich aber nicht darauf fest. Also, einfach e1000 als Nic eintragen und gut ist! Grüße1 point
-
Hat sich erledigt....Ich hatte vergessen die Mac User Skripte auszuführen1 point
-
Nein1 point
-
You can do it but only with a script.1 point
-
What a wonderful New Year's gift !1 point
-
Cheers! And I am truly grateful for your care about Chinese users, not only the technical support, but also the humanistic care.1 point
-
Do you try this from your local network or from an external source, please keep in mind if you try it from your local network and your router modem isn't capable or not properly configured for NAT reflection it can't work... What you can do is that you get in touch with your ISP if they block ports and if they are willing to turn it off. As said above Valheim uses a proprietary code/protocol so that it only answers game clients and the site can only detect ports where it gets a proper response with a protocol that it can understand.1 point
-
Yes, this can take up to 30 minutes I think from reports that I've read here. If you can reach it from the Steam Server browser it should be all good and show up in the in game server list if you select 'Community'.1 point
-
That makes sense now. I was able to use Steam to directly connect to my server's public IP even when connected from my gaming VM via VPN. My server is just not showing up in the community browser in Valheim which I suppose at this point could just be early access growing pains. Thanks for your help!1 point
-
For a long time there was only one pool and it was called "cache". The ability to have multiple pools was only added in the beta phase of 6.9. I've explained how it is, but I'm not going to argue about why. To understand it better you might find this article useful: It was written before multiple pools were possible. The concept of the cache pool was extended to allow for multiple pools. You can cache files being written to a given user share in any one of the pools you have available. Traditionally there was only one and it was called "cache". Now it can be called something else. Additionally, a pool doesn't have to be used exclusively, or even partially for caching. In fact, the typical use for a pool (even the one called "cache") is to store application data for Docker containers and virtual disk images for VMs. The terminology currently in use could probably be improved. You can move files from a pool to the array and from the array to a pool (the same or different - you can choose) by careful use of the "Cache:" and "Pool:" options and running the Mover.1 point
-
I missed the word "before" and was only seeing the before pic since I hadn't scrolled far enough before. I was like "uhhhh"1 point
-
Sounds good to me! Feel free to use anything that I have written, although it's not great python code. I think the useful parts are figuring out what Steam API endpoint to use to check against as well as how to manage other containers from a container.1 point
-
Looks like it was the 870 QVO drive. Switched back to an 850 EVO and haven't had a problem. Solved.1 point
-
@Cyd Thanks for the help with -automanagedmods the other day. For anyone running a modded Ark server/cluster, I have created a companion container to run alongside and automate the whole checking if mods update and triggering resets. It scans a given mounted /mods folder and queries Steam API to see if a mod has updated. If one has, it broadcasts warnings in the servers and then restarts them. If you have a cluster, it will restart the primary (server setup with -automanagedmods) server and stop all of the others. Once that server has updated your mods and is running, it will start back up the other ones that were running (leaving stopped ones untouched). Feel free to use it. integrate the concept, or modify it however you want. https://github.com/jalbertcory/ArkDockerModUpdater1 point
-
Nevermin, i feel dumb, 5caracters minimum in the password, i had 4.....1 point
-
If you do not receive a reply, let me know. I have the email address of a support contact at ASRock that has helped me and many others in these forums with special BIOS and troubleshooting issues.1 point
-
Look there for advices : https://forums.unraid.net/topic/102010-recommended-controllers-for-unraid-last-updated-022021/ No, Unraid identifies drives with their Serial Number .1 point
-
I forgot to mention that the huge 2017 WannaCry cyber attack used a vulnerability in the SMB protocol (port 445) to spread around the globe (https://en.wikipedia.org/wiki/WannaCry_ransomware_attack). So in a way, even if you do not care about your data being at risk, leaving such services opened to the internet can help the spread of cyber attacks and harm others.1 point
-
Thanks, I tried to put it in code field to minimize bloat, apparently that didn't work. Yea, tried 5 characters for password, didn't work. Appears the minimum is 6 characters, no digits. Now it starts flawlessly every time. Thanks for pointing me in the right direction, been banging my head against the wall for hours Maybe update that instruction to 6 instead of 5.1 point
-
I've implemented this now into the container and it should save the world now. So the script isn't needed anymore, a 'docker restart Valheim' or 'docker stop Valheim' is now enough. EDIT: Please force an update of the Container on the Docker page in Unraid. Also please edit your thread about that it doesn't save/closes the database, now it does.1 point
-
Your database is corrupted (or your game world is less than 30 minutes old?) - Copy the .db.old file over the .db file (or restore from snapshot if you have one) I had my database corrupt this evening as well. edit: info below is redundant thanks to docker changes - Thanks @ich777 PSA: Retarting the Valheim docker does not save/close the database file gracefully. The Valheim server only commits the worldstate to disk every 30 minutes, so you will lose up to this, or possibly corrupt the database. You can confirm this by checking the datestamps on .db file at: appdata/valheim/.config/unity3d/IronGate/Valheim/worlds To restart the server gracefully, create a "User Scripts" entry with the following commands: #!/bin/bash pkill -2 valheim ping localhost -c 3 >nul docker restart Valheim This tells the Valheim server to save/close the DB file before shutting down, and then restarts the whole docker. I run this twice daily as the game is getting constant updates at the moment.1 point
-
most probably you need to add your wireguard network to the LAN_NETWORK env var for sabnzbdvpn, otherwise it will be blocked when you are on the vpn, if you want more than one network then use a comma to seperate the values.1 point
-
When you create or edit docker containers you can mount folders and files on the host to locations inside the container. Example: I mount my /mnt/user/share/media directory to /media_share in the container for storing timelapse photos.1 point
-
Woher bekomme ich Apps? Die Community Apps bieten Zugriff auf Plugins und Templates für viele Docker Container. Um den Eintrag im Menü freizuschalten, geht man auf Plugins > Install Plugin und fügt diese URL ein (Support) : https://raw.githubusercontent.com/Squidly271/community.applications/master/plugins/community.applications.plg Ein Template erleichtert hierbei die Installation, da bereits verschiedene Pfade und evtl notwendige Variablen von andern Usern der Community vorausgefüllt wurden. Wenn das Konzept irgendwann verstanden wurde, kann man aber auch jeden anderen Container installieren. Welche Plugins sollte ich installieren? Ohne Anspruch auf Vollständigkeit sind die folgenden Plugins quasi unverzichtbar: - Fix Common Problems (informiert dich über Konfigurationsfehler und löst Benachrichtigungen bei veralteten Plugins aus) - Unassigned Devices (ermöglicht die Einbindung von USB Laufwerken und Netzwerk-Freigaben anderer Server) Weiterhin empfehlenswert: - CleanUp Appdata (entfernt man Container, können hiermit auch die Nutzerdateien gelöscht werden. Vorsicht!) - Unbalance (falls man komplette Verzeichnisse von einer HDD zur anderen verschieben oder auf mehrere verteilen möchte) - User Scripts (Bash/Shell Skripte per Cronjob ausführen) - Config Editor (falls mal eine Config Datei auf dem Stick oder sonstwo bearbeitet werden muss) - CA Appdata Backup/Restore v2 für die Sicherung des USB Sticks oder des Appdata Netzwerkordners - Duplicacy, Lucky Backup, Duplicati oder Rsync für Backups Wo finde ich mobile Unraid-Apps? Unraid selbst bringt keine Apps mit, sondern setzt voraus, dass man sich für den jeweiligen Einsatzzweck einen Docker Container installiert, der eigene Apps mitbringt: Dateien teilen, WebDAV, eigene Cloud - Nextcloud Filme anschauen - Emby - Jellyfin - Plex Musik hören - Plexamp (kostenpflichtig) Fotos anschauen - Nextcloud - Plex Videoüberwachung / Surveillance - Blue Iris (kostenpflichtig), Container im Beta-Status, stabil in einer Windows VM - Frigate Notizen - Nextcloud + Notes (Browser) + QOwnNotes (Windows + Mac) + Nextcloud Notes (Android) + CloudNotes (iOS) - Nextcloud + Joplin (Apps für alle Plattformen, außer Browser) Container über das Internet erreichbar machen - Portfreigabe im Router von 80 auf 1880 und 443 auf 18443 + Nginx Proxy Manager Welche Zeitpläne soll ich einstellen? Empfehlungen und Erklärungen findest du in dieser Diskussion. Warum kann ich mich mit einem User nicht bei der Unraid WebGUI anmelden? Die User sind ausschließlich für den Netzwerkzugriff. Die WebGUI kann einzig über den User "root" genutzt werden (sicheres Passwort wählen!) Was sollte ich zu Anfang einstellen? - einen Netzwerk-User hinzufügen - Bei allen Freigaben > SMB Sicherheit > Export auf "Ja" (oder "Nein") und Sicherheit auf "Privat" - bei der Disk-Übersicht auf den Stick klicken und auch da unter SMB Sicherheit Ja + Privat - in den Einstellungen den FTP Server deaktivieren (Achtung, ein FTP Nutzer hat Vollzugriff = SMB Sicherheit gilt nicht!) - in den Einstellungen die Zeitzone einstellen - in den Einstellungen bei Management > Telnet, SSH und UPnP deaktivieren, wenn nicht benötigt (Tipp: oben rechts das ">_" öffnet das WebTerminal) - Apps installieren (siehe "Woher bekomme ich Apps?") - Zeitpläne einstellen (siehe "Welche Zeitpläne soll ich einstellen?") - optional: in den Einstellungen unter Netzwerk das "Bonding" (mehrere LAN Ports verbinden) deaktivieren und das "Bridging" (notwendig für Docker+VM) aktivieren - optional: Feste IP-Adresse vergeben (optimal außerhalb der DHCP-Range, bei einer Fritz!Box zB .2 bis .19) Benötige ich eine Grafikkarte? Wir empfehlen eine CPU mit integrierter Grafik (iGPU). Unraid nutzt die im BIOS eingestellte primäre GPU aus zwei Gründen: 1.) Für den optionalen GUI Modus (inkl. Firefox) 2.) Damit Docker Container darauf zugreifen können 3.) Wenn es eine Intel iGPU ist, kann diese zur Beschleunigung von virtuellen Maschinen verwendet werden Wie schnell sollte die CPU sein? Die grundsätzlichen Hardware-Anforderungen sind sehr gering. Für ein optimales Erlebnis ist eine CPU mit mindestens 1400 Single Thread Passmark-Punkten empfehlenswert. Benötige ich einen SSD Cache? Mit einer Paritäts-HDD ist die Schreibgeschwindigkeit je nach HDD auf 40 bis 90 MB/s begrenzt, was langsamer ist als eine 1G Netzwerkverbindung (Hinweis: Wechselt man auf "Reconstruct Write" erhöht sich diese auf die maximale Geschwindigkeit der HDD, allerdings laufen dann immer alle HDDs parallel). Die Lesegeschwindigkeit ist auf die maximale Geschwindigkeit einer HDD begrenzt. Mit einer entsprechend schnellen SSD können selbst 10G Netzwerkverbindungen problemlos ausgelastet werden. Ein SSD Cache hilft außerdem beim Strom sparen, da die dahinter liegende HDD dauerhaft still stehen kann (Standby). . Benötige ich zwei SSDs für den Cache? Dateien befinden sich entweder auf der SSD oder dem HDD Array. Mit nur einer SSD besteht die Gefahr, dass diese Dateien verloren gehen. Ein regelmäßiges Backup hilft nur, wenn keine Dateien auf den Server verschoben, also von der Quelle gelöscht wurden. Wir empfehlen daher zwei SSDs. Wie übertrage ich die Dateien von meinem alten NAS? Das Unraid Array nutzt standardmäßig das XFS Dateisystem, womit jede HDD einzeln formatiert wird. Das alte NAS nutzt in der Regel ein (proprietäres) RAID. Unraid benötigt also für die Übertragung eigene HDDs. Dazu eignen sich dann die Standardwerkzeuge wie rsync, Drag & Drop über SMB oder das Einbinden der Quelle per Unassigned Devices + Datei-Explorer wie Krusader. Bei der Erstbefüllung sollte man: - den SSD Cache deaktivieren, damit dieser nicht unnötig abgenutzt wird und - die Parität erst mal weglassen oder "Reconstruct Write" (TurboWrite) aktivieren, damit die Übertragung schneller ist1 point
-
I've been experiencing the same issue over the last couple of days with the very same behavior. As soon as I put load on the drive, it goes offline and even a reboot doesn't help. I had the same problem a couple of weeks ago back when the drive wasn't housing my Docker files and just acted as a secondary cache drive and iirc I actually managed to fix this, but for the life of me I can't remember what I did...back then it happened when trying to remove unnecessary streams from mkv files - the drive just collapsed. After I changed something though it worked without issue. EDIT: Same issues described here: EDIT2: I found my fix in my backed up config files: Adding "nvme_core.default_ps_max_latency_us=0" to "Unraid OS" in the syslinux configuration made the issues disappear.1 point
-
I thought their normal releases was beta...1 point
-
I did a quick search and couldn't find this banner, so I thought I'd make one. It's still Christmas, right?
 1 point
 -
@carltonb I have just got this working. You need to: Follow the instructions at this link to get values for YUBICO_CLIENT_ID and YUBICO_SECRET_KEY. In UNRAID - open the settings for the bitwardenrs Docker container At the bottom click on "Add another Path, Port, Variable, Label or Device" Set Config Type = Variable, Name = YUBICO_CLIENT_ID, Key = YUBICO_CLIENT_ID, Value = <Your Yubico Client ID> Click Add Add another variable as above for YUBICO_SECRET_KEY Click APPLY to restart the Docker container That should be it - now you can configure the Yubikey in the Bitwarden Settings.1 point
-
Hi, I wanted to use this pihole docker as my second dns server, i already have a hardware raspberry pi as my main pihole dns, but having a backup is always good. I was wondering how i could change hostname of this pihole installation? I was hoping to simply ssh in and change /etc/hostname to whatever i wanted but there is no editor included in the docker so unsure how i would accomplish this. Ideas? Thanks. EDIT: Figured it out: ssh into the docker cp /etc/hostname /etc/pihole/ ssh into your unraid install nano /mnt/cache/appdata/pihole/pihole/hostname changename + save ssh back into the docker cp /etc/pihole/hostname /etc/ EDIT AGAIN: Wont survive docker container restart damn. EDIT One More time! added --hostname pihole2 to the run command in docker, seems to work!
 1 point
 -
@SpaceInvaderOne Thanks for the nod for my Yeti contribution to you early on, and I feel lucky to have been able to be one of your earliest supporters and "egg you on" to do this - I IMMEDIATELY saw the value for what you were doing. No surprise to me that you've succeeded and excelled at it -- I continue to be impressed by the progressive quality of your videos, both production quality but the content organization and delivery - your ability to tame this down for the novice is unique in my opinion (agree with the others, there's alot of headroom to take this further in expanding the platform). Of course helping with the mic was very self serving since I've been so dependent on your videos to get over the hump of the limits of my Linux knowledge to get my UnRaid projects to goal lol. However your positive / friendly / helpful attitude and loyalty to the community (and I presume life in general) is what is most impressive, and I agree with your comments about this as such a common trait that the UnRaid crowd has managed to maintain that makes it so enjoyable. And by the way, you now have MAD skills with Camtasia !!! Thanks @SpencerJ for the interview, and of course Thanks @SI1 for all you do.1 point
-
You would have to go to Settings - Docker, disable the service, then enable template authoring mode, re-enable the service, and then the edit button will be there.1 point
-
You can configure the attach network command to be run after it creating the docker. If you go to ADVANCED VIEW when updating/creating a docker container. Under the Post Arguments line you can write the following: ; docker network connect NETWORK CONTAINER Now when UNRAID updates the container, it will run this command afterward to connect it to the right network.
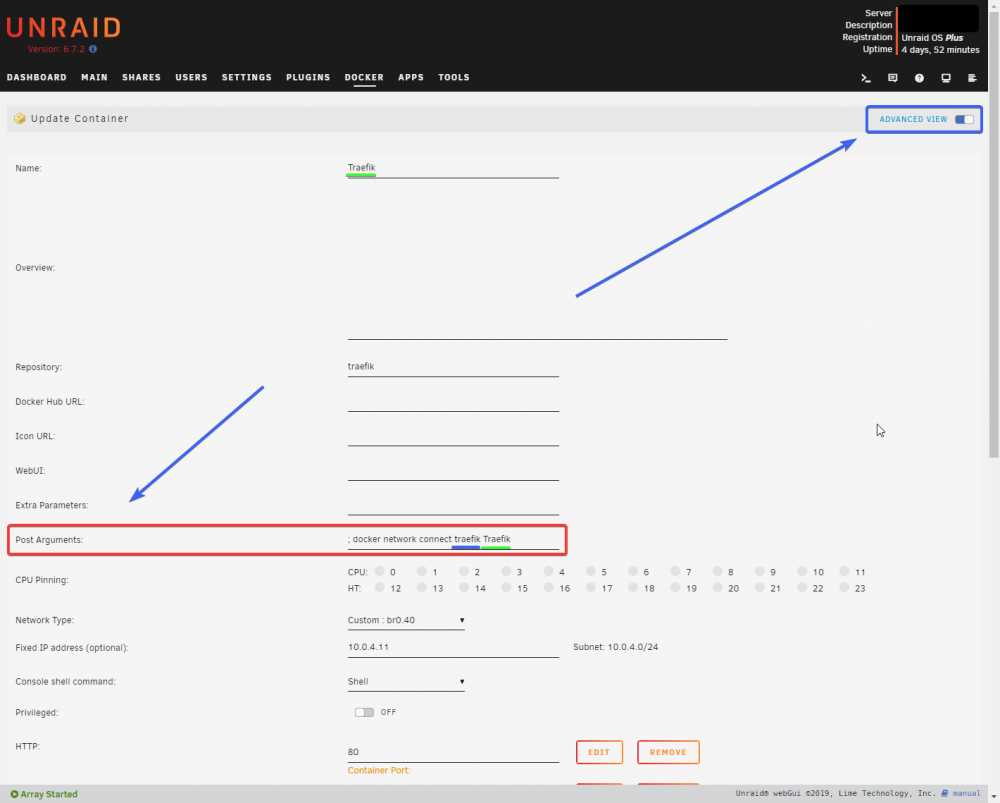 1 point
 -
320!!! Need a picture of this beast!1 point